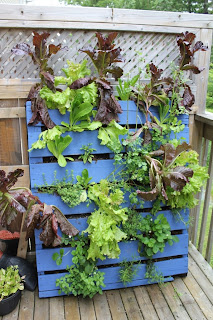
So I went a little bejonkers - well a lot bejonkers when I stumbled upon repurposed pallets for gardening. There are as many ideas out there as there are imaginative people but I said, what the heck, I'd give it a try too.
First thing you have to know is that with my directions you won't finish this project in one day. Mine took about a month. A MONTH!!! Holy Hannah, that's a long time. Don't worry I'll explain along the way.
Note that this is a long, rambling post... But stick with me. It'll be worth it.
It's nice having friends... It's really nice when their employer has old pallets kicking around.
Now, there are loads of web pages talking about food safety and growing things in pallets. You can google them and make your own decision, I am reassured that the wood from these pallets is not chemically treated so I felt OK about using them. Also, while I did paint my pallets, I made sure not to paint the inside of the planks so any chance of chemical transfer is minimized. You could skip the painting steps but I wanted colour. The choice is ENTIRELY yours.
The other thing to note is that I wanted my pallets to be vertical. You could as easily have them laying on the ground.
 |
| Pallet supplies |
Items you will need
PalletSandpaper
Hammer
Paint (if you wish)
Landscape Fabric
* I stapled 3 layers of fabric on the back of each pallet. Soil gets heavy when it gets wet and you don't want it tearing *
Scissors
Staple Gun
Staples (I purchased 2 packs of 2000. I know it sounds like a lot, but overstapling is a good thing)
Soil/Manure/Peat (about 150 litres total depending on pallet size)
Plants
Wood (in case you need to brace the pallet)
Steps to Follow
- Find a pallet (or 2 - in my case 3) then sand down the rough bits, hammer in any pokey nails that could get in the way.
- Paint the pallet (if desired).
- Flip the pallet over so the back is exposed.
- Take a length of landscape fabric (approximately 3 inches longer than the pallet for folding and making corners). Also make sure the width is enough to fold along the sides.
- Staple along the boards as shown in picture.
 |
| Layer 1 stapled |
- Add another piece.
 |
| Finish of layer 1 |
- I added 2 more layers of fabric on the pallet.
 |
| 3 Layers stapled |
- Fold the corners and fold around the sides. Don't forget the bottom. Use lots of staples. This will prevent the soil from coming out when you plant and go "vertical".
- If in doubt, add some more staples. Honestly, I was pressing wherever the whim took me!
 |
| Sides and Corners |
 |
| Final product Fabric step |
As I said previously the pallet will have lots of heft to it so be sure that where you lean it can take the weight. What I realized is that the wall between my deck and my neighbours was too slight for the pallet so I installed a brace.
I won't go into detail as it really does depend on your situation. I am including pictures which I hope gives some sense of what I needed.
 |
| Brace Supplies |
 |
| Brace Installed |
 |
| Brace and Pallet Side View |
Planting the Pallet
- Get a bucket and mix your soil. I use equal parts potting soil, manure and peat. Dump it onto the pallet and use your hands to tuck it in. It took some time and ensure you have some left over because once it rains and eventually goes "vertical" the soil will settle. Now this is FUN!
- Next step is adding plants. Everyone has their own method so I will simply show pictures of what I did. I am going to use strawberry plants for the example.
But wait!!! Do I flip it up immediately?? Ohhhhh no!
The soil needs time to settle. If you flip it up now the soil will come tumbling out. My recommendation is to leave it horizontal for about 3 weeks to allow the plants to root and expand. Also, water is wet (I'm a part time rocket scientist don't you know) and heavy so after the 3 week mark, wait until it has 2 or 3 days to dry out a little. Trust me, it's so much easier on your muscles especially if you have to move it very far to it's final "resting place".
*Have a little soil on hand to tuck in where needed when you go vertical. Some soil will come out and settle so you need to amend it some.
 |
| Vertical Glory |
 |
| Annuals |
 |
| Strawberries |
 |
| I admit the Lettuce has gone crazy |
 |
| Annuals |
 |
| Strawberries |
Cheers,
Lori
Updates: December 17th, 2014 - A gentleman by the name of Alan Crowe (out of Co.
Leitrim, Ireland) contacted me with a neat infographic. He works at Crowes Sawmills and I thought I would share the picture with you all to demonstrate the versatility of a pallet.
 |
| Here it is in small format |


this is awesome and so pretty and healthy :-)
ReplyDeleteOh my!! LOVE THIS!!! :)
ReplyDeleteThat is so cool. Living wall!
ReplyDeleteVery cool! I feel like I could never get this done with Rowan around, but it's a great project. I use a pallete as a shelf for some plants outside and another one to make a table for our backyard by throwing it on some cinderblocks. It's not pretty, but it's a start!
ReplyDeleteThese are gorgeous!
ReplyDeleteI love the lettuce. I covet your crazy lettuce!
Awesome DIY post!