Pages

Tuesday, July 30, 2013

Life is Never Simple

I know words in the title is oft used and applies to anything but it's the only words I can come up with today.

This post is both sad and irreverent - if you feel that I will offend you, step away.

Relationships with parents are complicated...

Before I start my meandering ramble let me share with you some of my life experiences. Some of you know it, but I'll assume not.

Cancer is a fucking bastard...  It has steeled it's eye on my family and delights in wreaking havoc and devastation.  I know it's not only my family but today I am selfish.

A year ago today my dad slipped away - not slipped away with a fake passport to Tahiti but after a year of treatments pancreatic cancer took another soul.

Kind of a sad note to start at but it isn't - truly.

You see my dad was funny - dry humour, great timing funny.  Most times it was natural, not a conscious effort, just things he said or did made us laugh.  He could turn a phrase in such a way that had me in stitches.

He was my hero. Every day - even times that we didn't agree or I thought he was unreasonable or strict I loved my dad. His life wasn't easy, losing his wife to cancer and having 3 children to raise. He was pragmatic, honest, helping his community/church/family was the right thing to do.

See? We were lucky kids.

As a child, we imagine our parents would live forever - invulnerable to everything. When we age we should expect our parents to do the same, but we don't - it comes as a surprise and then we see them as frail. 

This time last year I stood at the foot of a casket but I only saw my dad - with an 8ft log on his back, walking down the hill and tossing it on the pile. The man who could lift a mountain and taught me about growing potatoes in a bucket... 

His lessons were big.  Treat people well, live happy, work hard and love.
 
Dad, my step-mom and my niece

Wednesday, July 10, 2013

Upcycling a Wooden Pallet for Gardening


So I went a little bejonkers - well a lot bejonkers when I stumbled upon repurposed pallets for gardening.  There are as many ideas out there as there are imaginative people but I said, what the heck, I'd give it a try too.

First thing you have to know is that with my directions you won't finish this project in one day. Mine took about a month.  A MONTH!!! Holy Hannah, that's a long time. Don't worry I'll explain along the way.

Note that this is a long, rambling post... But stick with me. It'll be worth it.

It's nice having friends... It's really nice when their employer has old pallets kicking around. 

Now, there are loads of web pages talking about food safety and growing things in pallets. You can google them and make your own decision, I am reassured that the wood from these pallets is not chemically treated so I felt OK about using them.  Also, while I did paint my pallets, I made sure not to paint the inside of the planks so any chance of chemical transfer is minimized.  You could skip the painting steps but I wanted colour.  The choice is ENTIRELY yours.

The other thing to note is that I wanted my pallets to be vertical. You could as easily have them laying on the ground.
Pallet supplies

Items you will need

Pallet
Sandpaper
Hammer
Paint (if you wish)
Landscape Fabric
* I stapled 3 layers of fabric on the back of each pallet. Soil gets heavy when it gets wet and you don't want it tearing *
Scissors
Staple Gun
Staples (I purchased 2 packs of 2000. I know it sounds like a lot, but overstapling is a good thing)
Soil/Manure/Peat (about 150 litres total depending on pallet size)
Plants
Wood (in case you need to brace the pallet)

Steps to Follow

  • Find a pallet (or 2 - in my case 3) then sand down the rough bits, hammer in any pokey nails that could get in the way.
  • Paint the pallet (if desired).
  • Flip the pallet over so the back is exposed.
  • Take a length of landscape fabric (approximately 3 inches longer than the pallet for folding and making corners). Also make sure the width is  enough to fold along the sides.
  • Staple along the boards as shown in picture.
Layer 1 stapled
  • Add another piece.
Finish of layer 1
Don't be afraid to use lots of staples to avoid tearing of the fabric. Once the soil and plants are in the pallet gets heavy!!

  • I added 2 more layers of fabric on the pallet.


3 Layers stapled
  • Fold the corners and fold around the sides. Don't forget the bottom. Use lots of staples.  This will prevent the soil from coming out when you plant and go "vertical".
  • Sides and Corners
  • If in doubt, add some more staples.  Honestly, I was pressing wherever the whim took me!
Final product Fabric step
So the pallet is ready to be planted.  Have you decided where you are going to put it?  I have 3 pallets and installed them in different spots in the garden.  For the sake of this post, let's take the first one I installed on the deck.

As I said previously the pallet will have lots of heft to it so be sure that where you lean it can take the weight. What I realized is that the wall between my deck and my neighbours was too slight for the pallet so I installed a brace.

I won't go into detail as it really does depend on your situation. I am including pictures which I hope gives some sense of what I needed.
Brace Supplies

Brace Installed

Brace and Pallet Side View

Planting the Pallet

  • Get a bucket and mix your soil.  I use equal parts potting soil, manure and peat. Dump it onto the pallet and use your hands to tuck it in.  It took some time and ensure you have some left over because once it rains and eventually goes "vertical" the soil will settle. Now this is FUN!


  • Next step is adding plants.  Everyone has their own method so I will simply show pictures of what I did. I am going to use strawberry plants for the example.


I planted away and...
But wait!!!  Do I flip it up immediately??  Ohhhhh no! 

The soil needs time to settle. If you flip it up now the soil will come tumbling out. My recommendation is to leave it horizontal for about 3 weeks to allow the plants to root and expand. Also, water is wet (I'm a part time rocket scientist don't you know) and heavy so after the 3 week mark, wait until it has 2 or 3 days to dry out a little.  Trust me, it's so much easier on your muscles especially if you have to move it very far to it's final "resting place".

*Have a little soil on hand to tuck in where needed when you go vertical. Some soil will come out and settle so you need to amend it some.

Vertical Glory
Here are the other two when I planted them.  Same thing, different plants.
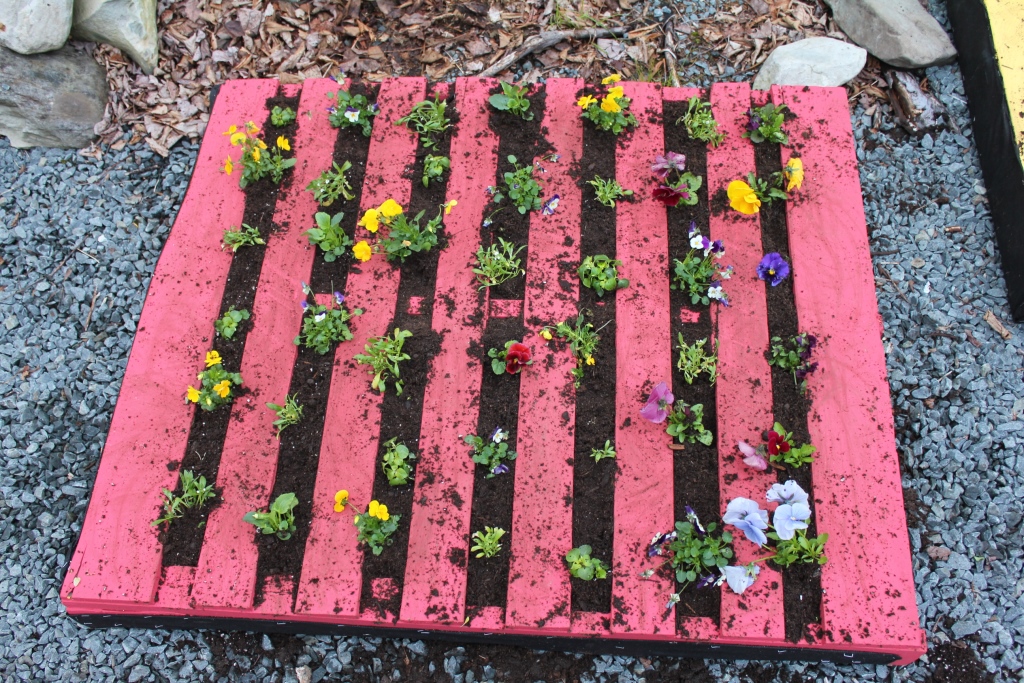
Annuals
Strawberries
So... there you go.  Three pallets. Lots of growing in little real estate.  Are you curious how they are doing now??

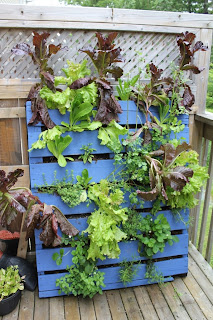
I admit the Lettuce has gone crazy

Annuals

Strawberries
There you are - my love of the pallet garden.  Feel free to comment with questions.  Lots of information and my brain has simply shut down!

Cheers,
Lori

Updates: December 17th, 2014 - A gentleman by the name of Alan Crowe (out of Co.
Leitrim, Ireland) contacted me with a neat infographic. He works at Crowes Sawmills and I thought I would share the picture with you all to demonstrate the versatility of a pallet. 
Here it is in small format

Monday, July 8, 2013

Slow Cooker Beer Mac N Cheese (Macaroni and Cheese for you fancy folk)

Sunday was hot as Hades and I decided it was a perfect day to make lunches for the next week or so.  Yep - logic is my middle name.  I have made Slow Cooker Mac N Cheese in the past but thought I would change a few things to make it taste more distinct.
 
Ready to go?
 
 
While I used a Crock Pot (Slow Cooker), you could absolutely put this is a casserole dish and bake at 350F for about 30 mins.

 
Ingredients (oops, missed one!)

Slow Cooker Beer Mac N Cheese

Stuff you need:

2 cups uncooked elbow macaroni - you could totally use penne or fusilli
4 tablespoons butter
4 tablespoons flour
1 cup milk (I used full fat homogonized from FoxHill Cheese)
2/3 cup of beer (I used St. Ambroise Oatmeal Stout - but use whatever you like)
2 1/2 cups grated cheese which is made of:
  • 1/3 cup of 4 cheese mix
  • 1/3 cup of Austrailian cheddar
  • 1/3 cup Mexicana cheddar
  • 1 1/2 cup of old Canadian cheddar
1/2 cup sour cream
1 can condensed cheddar cheese soup
1/4 teaspoon salt
1/2 teaspoon dry mustard
1/2 teaspoon black pepper
1/4 teaspoon nutmeg (if desired)
Chopped green onion (if desired)


Whew - here's the add on!
Start of the Roux
I wanted to incorporate beer and thought the best way would be to create a cheese sauce.  All my sauces of this nature starts with a Roux.  Simply put, use equal parts fat (like butter) and flour in a pan and cook on medium essentially toasting the flour (eliminating the raw taste).

Key: keep whisking the entire time. Couple of mins. You will smell the toasty goodness and the colour of the Roux will change.
Roux once the butter and flour has cooked to a toasty brown
 Then I added the milk (whisking constantly), allowed it to thicken. Then I added 1/3 cup of beer - whisk away. Added rest of beer and whisk.  It needs to be lump free!!!

After adding milk and beer
Cheeses (missing: Old Canadian Cheddar)
Melting
 Add cheese and melt - I switched to a high heat tolerable spatula to stir the sauce.  Again - no lumps!
Cheese Sauce
Meanwhile I cooked the 2 cups of pasta in salted water for 6 mins and drain.
Cooked Elbow Macaroni
Sour Cream
I sprayed the inside of my crock pot dish with non stick spray. Poured in cheese sauce, added condensed cheese soup, sour cream, dry mustard, pepper, nutmeg and salt. Mix completely.
Pre Addition of Macaroni
 Dump in macaroni, stir completely.  I also added a little green onion for taste.
All mixed and ready to go
 Cook on low for about 2 1/2 hours.  I stirred at the 1 hour and 2 hour point.
Cooked (2 1/2 hours later)

Final Product


I know it seems like a lot, but it really isn't.  One lesson I learned is that the Mexicana cheddar was perhaps the wrong cheese for this mixture - I would try Morbier from Charcuterie Ratinaud. It's excellent in Mac N Cheese!

Use the combo of cheeses you want, the pasta and the beer - mix it up and make it rock for you!!!

Cheers all

Lori


Wednesday, July 3, 2013

Judgement brings out the worst in me

It's been a while - busy, bored, whatever... You all know the drill. You live it too.

Yesterday I am headed to the bus. In my own world, snickering at something in my head, I look to see what line to get in for the bus and make eye contact with a woman. She stared me up and down with a vague look of disgust on her face. When her eyes met mine, my eyebrows were up in my bangs as if to say - Yessss? I responded with a saucy look.

I go to Twitter, as I usually do to vent, rave or mumble. Muttering about this lady. The feedback is swift, supportive, humourous and kind. More on that momentarily.

I sat on the bus and mentally scanned myself - why would someone be disgusted to see me? I am clean, tidy, smiling and presentable.  Or am I? I am inarguably overweight (I call it rubenesque but whatever), I wear clothes and shoes that please me (skirts over the knee and heels to high heaven).  Do I dress inappropriately for my body shape? Age? Gender? Employment?

Suddenly I am 15 again. Hating my looks. Self-conscious to an extreme degree. Wearing ill-fitting clothes.  No physical sparkle, no shine. Second guessing everything I say, do or think. Worrying about my looks is, in the big scheme of life, pretty damn minor - I still do.

Then I look at Twitter:

Tina @tinacapalbo
Lori @pitcherplantnl: Does it really matter tho? Some people r very judgmental for entire life then settle into it like an entitlement in old age.
 
Does it really matter what a complete stranger thinks? Does it matter what anyone thinks? Was I happy in the 30 seconds preceding this encounter? Was I proud to be me? Why do I f-ing care?
 
I wish I had an answer - not so much to explain to you, but for me.
 
I wish I could tell you that her look didn't make me pause this morning while getting ready for work.  But I wore what I wanted anyway. Maybe that's all the explanation I need.
 

Postscript

 
Maybe her look had nothing at all to do with me. Huh - why didn't I consider that?